Degree
Works –
Student Degree Audit System
Welcome to Degree Works! Access the logon page from PAWS (https://paws.southalabama.edu/) or
enter the URL of the logon page using an Internet browser. Mozilla Firefox is the recommended Internet browser for Degree Works.
It is recommended that you create a bookmark for the logon page to make the
connection quick and easy.
Login and Introduction Page
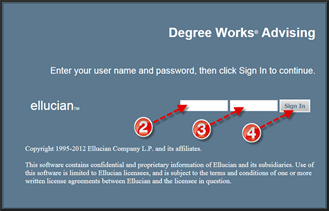
1. To access the Degree Works Introduction page, use the bookmark you saved earlier or go to the Degree Works login page at http://dwapptst.usouthal.edu/
2. Enter your User ID (note: your UserID is your Jag Number.)
3. Password
4.
And press Enter.
The introduction page contains brief information about the Degree Works
functions available along with navigation buttons positioned along the top of
the page. These buttons include: FAQ,
Help, Print, Exception Management, Template Management and Log Out.
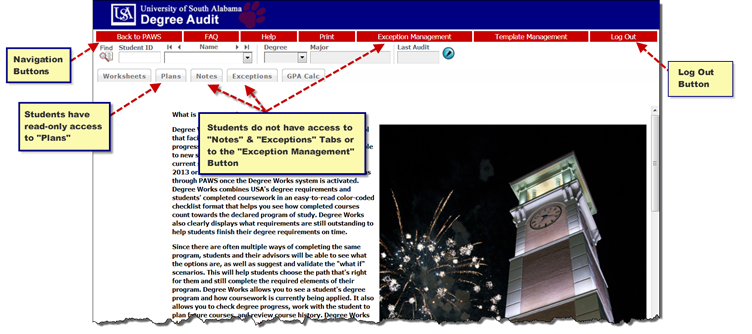
Not all Degree Works users will have access to all functions described on this
page. The Exceptions and
Notes tabs as well as the Exception Management button are not available to student users by default. The Plan feature is available to students in read-only mode.
Student Search
When searching for a student, there are a variety of ways to access the student’s Degree Audit file in Degree Works. We will walk through three of these methods:
· Enter the Student ID
· Search by Student Name
· Search for group of students with designated degree criteria
· Combination of name and degree criteria
Method 1: Using Student ID
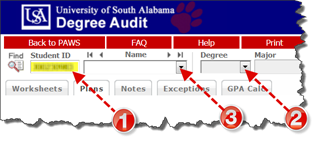
1. Type student’s Jag number in the Student ID field and press Enter or Tab. The degree audit screen should open for the selected student.
2. For students with multiple degrees, the Degree drop-down list box can be used to select the degree for audit processing.
3.
The Name field contains a drop-down list box of
students available to the user depending upon your user class.
Method 2: Search by Student Name
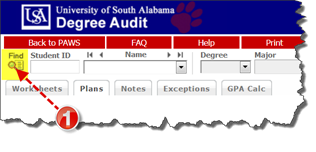
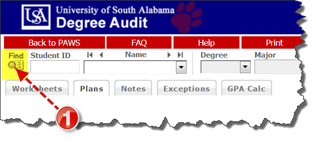
1.
Click Find icon in the upper left corner to begin
the search. The Find Students screen
will appear.

2. Type student’s name in the fields provided. You may use Last, First, or both fields. The wildcard “@” can be used as part of the search string in any of the fields. For example, a search for "We@" in a Name field will produce a list of all students who contain "We" as the first two characters of the field.
3. Click Search button to begin the search.
4.
All students who meet the search criteria will
be displayed in the panel at the bottom window of the search window. If there
are no names to match the selected criteria, you will see a notification. At that point, you may wish to change
the search criteria to broaden the search.
5. Uncheck boxes for individual students or use the Uncheck All or Check All buttons to select the desired list of students.
6.
Click OK
to load the selected student names to continue the Degree Audit process.

7.
Selected names will now appear in the drop-down box for Name where you may
choose the student whose Degree Audit screen you wish to view. When you are ready, select another name to
display the next student record for review.

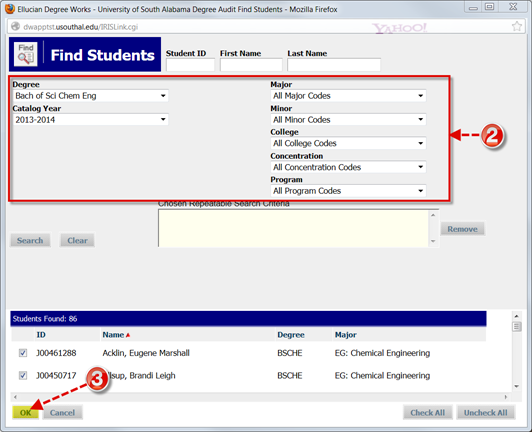
Method 3: Search by Degree Criteria
1.
Click the Find button to select an
individual or group of students based on specific Degree criteria. This will
open the Find Student search window. While this page can be used to select an
individual student using Jag number, name, or the group of students defined by
other selection criteria we will use it to illustrate selection by Degree
Criteria.
2. Use the variety of options outlined in step 2 of the illustration to select the desired student population.
3.
Once the population is selected, click the OK button. This will close the search
window and load the list of students into the drop-down list box in the Name
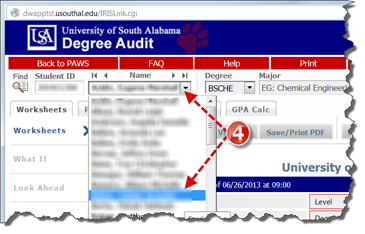
field on the Introduction page.
From this drop-down list box on the Introduction
Page, select individual students for audit processing.
The degree
context information for the first student in the list will be loaded
automatically once you click
OK on the search page. You will be
presented with a list of students for audit processing or you can select an
individual student by entering the student’s name or Jag number into the
appropriate fields on the Introduction page and pressing Enter.
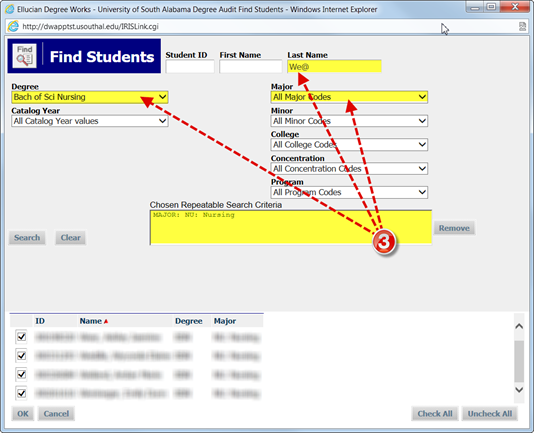
Method 4: Combination of Name and/or Degree Criteria
1.
Click the Find button. This will open the Find Student search
window.
2. This page can be used to select an individual student using Jag number, name, or the group of students defined by other selection criteria. Specify search criteria using any of the fields described in Methods 2 and 3. When multiple fields are used to set the search criteria, the results will be more refined.
3.
In the example illustrated here, we are
combining a name search with a designated degree and major.
Errors associated with search criteria
Based on the search criteria entered in the fields on the
Find Students window, you may get no results or too many results. In either case, you will need to change to
search criteria.
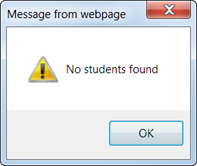
Too few results
Sometimes you put too many criteria in the search string
or use an invalid combination of criteria and do not get any matching students
as a result. For example, if the Biochemistry
major at your institution can only be taken as a Bachelor of Science Degree,
then a search for Biochemistry majors pursuing a Bachelor of Arts Degree will
not produce any results. As a result,
you might see an error like the one illustrated to the right: “No students
found.”
Too many results
On the other hand, if you do not
limit your search, it is easy to get a list of students with more than 200
matches. When this happens, you are
asked to limit your search by adding to the search criteria. Here is a sample of the error screen in such
a case.

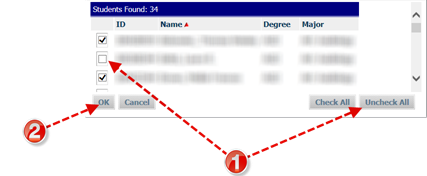
Sorting the results
Once you have created a list of students who meet your
selection criteria, you can sort the list that appears in the panel by clicking
on any of the field headers in the Students Found window. The default sort
order for the list is alphabetical in ascending (A-Z) order. The red arrow indicates the sort field being
applied to the list of students found.

To change the sort from ascending (A-Z) to descending (Z-A) order,
click the Name field header again. You will see the red arrow to the right
change from an up-arrow to a down-arrow indicating that the name field is now
sorted in descending order. Any changes
made to the sort criteria are valid only for the list of students found in the
preceding search. If you modify the search criteria and execute a new search,
the results will be displayed with Name as the default sort field. This sort
feature is not available if you are using Netscape 4.x.
Selecting the results
When you have successfully created your list of students using the Find function and entered the sort order, be sure the check boxes indicate the students you wish to select.
1. You can delete students from the list by un-checking the check box to the left of the student. Or for convenience when the percentage of desired students is low, you can use the Uncheck All button to deselect all names in the Students Found list and then select only the ones you need.
2.
Click OK to close the search window and load the
list of students into Degree Works. The list of students will load with the
same sort characteristics defined on the search page.
You may then select any student from the list for degree audit processing. Although it is possible to create a list of students who meet specific selection criteria, Degree Works on the Web can only perform degree audits on one student at a time. To perform degree audit and reporting functions on groups of students, use the Transit batch processing application.
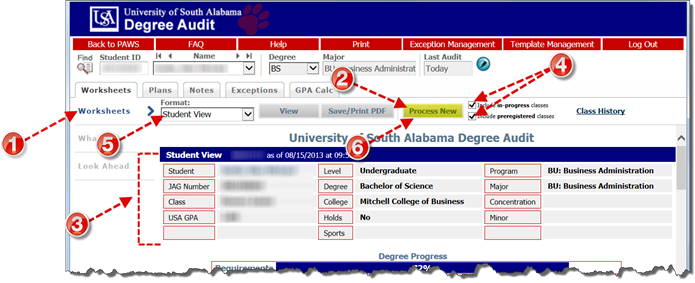
Processing Degree Audits
Degree Audits act as a guide to assist a student with planning courses to take toward completion of their degree requirements. This Audit does not replace an official transcript and an academic advisor may be contacted for assistance in interpreting this report. Degree audits are processed using the Worksheets tab. Follow these steps to proceed:
1. Use any of the methods described earlier to select the student you wish to process. This will automatically take you to the Worksheets screen and the most recent audit for this student will load automatically.
2. To ensure you are viewing the latest information available for this student, click the Process New button.
3. Review the student context information displayed in the fields at the top of the window which includes current degree pursuit, major, school, student level and the date the last audit was processed.
4. To include In-Progress classes or to include pre-registered classes, place a check in the appropriate check box(s). Both of these boxes are selected by default.
5. Be sure to select the appropriate audit report format.
6. Click Process New button to process the new audit for the selected student.
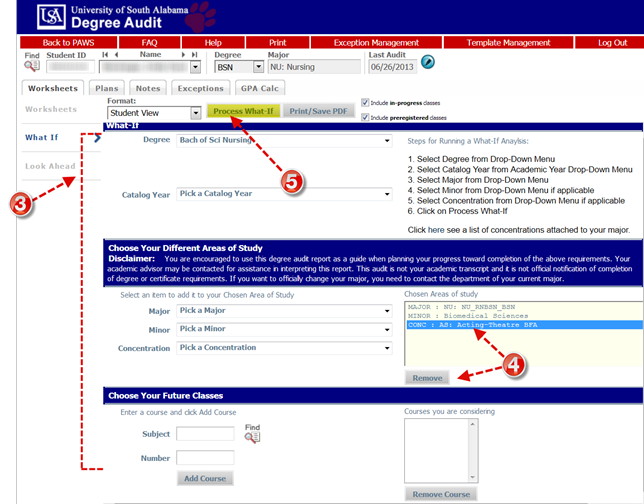
What-If Audits
What-If audits allow you to process speculative degree audits for a student using their current class history. From a What-If Audit screen, you can audit a student against the requirements for a different major, minor, degree, catalog year or any other selectable item.
It is important to remember that What-If audits are not stored in the database. After they are run, the results can be printed, but after leaving the What-If screen, the audit cannot be accessed again unless you save the output as a PDF. It is possible to run another What-If audit with the same parameters.
So, there are two different paths to follow to “process” the What-If after specifying the criteria for evaluation:
· Process What-If and decide later whether to save or print the output after reviewing the results on the screen. These steps are described in Method 1, or
· Print/Save PDF combines the Process the What-If and print or save the output to PDF for future reference as one command described below in Method 2.
·
To access the What-If screen, click. Of course,
you must first have a student selected.
Follow these steps to run a What-If Audit.
Method 1: Process What-If
1. Use any of the methods described earlier to select the student you wish to process. This will automatically take you to the Worksheets screen and the most recent audit for this student will load automatically.
2.
Click What
If in the left navigation panel. (If
you have been working elsewhere in the student’s audit record, it is important
to note that What-If is located on the Worksheets
tab.)

3.
To generate a What-If degree audit, select the
requirements against which you wish to audit the student – Degree, Catalog
Year, Major, Minor if applicable, and Concentration if applicable. In addition,
you may also add classes planned for the future. The selected items will be moved to windows
on the right for Chosen Areas of study
and Courses you are considering.
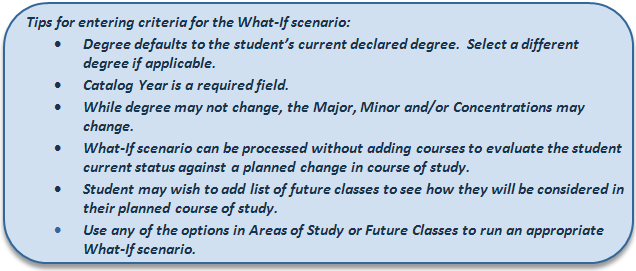
4. To deselect an item from the window, highlight the item then click the Remove button located below the appropriate window.
5.
Now to check for results. Process
What-If to preview the output in full screen view.
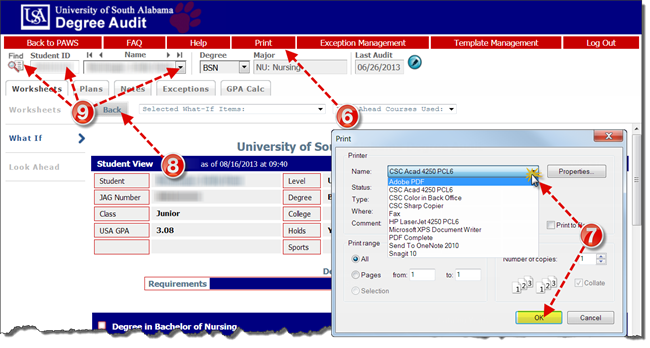
6. To print the output or save it to PDF for future reference, you can do so from the Degree Audit results screen. Click Print on the Red Menu Bar at the top of the Degree Works window.
7. The output will be directed to the default printer or you may choose to redirect to a different printer or to PDF by selecting it from the list of available printers in the dialogue box. If you choose to send output to a PDF, you will need to name the file and direct it to an appropriate folder on your PC so that you can easily locate the file later for reference. Follow prompts to complete the printing/saving PDF process.
8. To return to the What-If screen to run different criteria, click Back and repeat steps 3-7 outlined above.
9.
To run a What-If
for a different student from this window, use any of the previously
described methods to select the student and repeat steps 2-7 for running a
What-If process.
Method 2: Print/Save PDF
1. Use any of the methods described earlier to select the student you wish to process. This will automatically take you to the Worksheets screen and the most recent audit for this student will load automatically.
2.
Click What
If in the left navigation panel. (If
you have been working elsewhere in the student’s audit record, it is important
to note that What-If is located on the Worksheets
tab.)
3.
To generate a What-If degree audit,
select the requirements against which you wish to audit the student – Degree,
Catalog Year, Major, Minor if applicable, and Concentration if applicable. In addition,
you may also add classes planned for the future. The selected items will be moved to windows
on the right for Chosen Areas of study
and Courses you are considering. (Please review Tips for entering criteria for
the What-If scenario outlined in Method 1 on page 8.
4.
To deselect an item from Chosen areas of study or Courses
you are considering, click to highlight the item then click Remove located below the appropriate
window.
5.
Now to check for results. Click
Print/Save PDF to view output in browser window.

6.
From this display you can use browser tools at
the top of the window to navigate, print or download the document. Choose the appropriate tool(s).
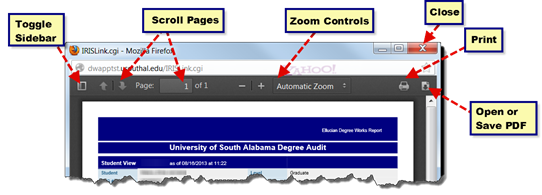
7. Print the document by clicking the Printer Icon. The output will be directed to the default printer or you may choose to redirect to a different printer or to PDF by selecting it from the list of available printers in the dialogue box. If you choose to send output to a PDF, you will need to name the file and direct it to an appropriate folder on your PC so that you can easily locate the file later for reference.
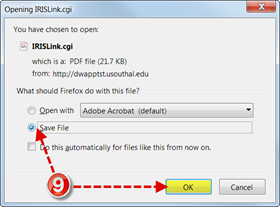
8. You may also wish to use the Download function. You may choose between opening the file in with Adobe Acrobat or Acrobat Reader. Check the appropriate box in the dialogue box displayed.
9.
To save the What-If for later reference, select
Save File and click OK.
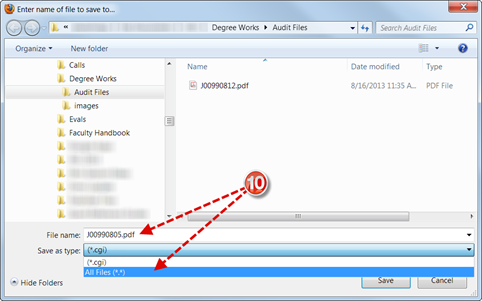
10.
When saving the PDF, you should be certain to browse to an appropriate folder on your
PC, name the file logically (perhaps using student’s name/ID and date the
What-If is created). Be sure to add .pdf as the file extension and change
the file type to All Files (*.*) and click Save.
To review previously saved What-If Audits, browse where you saved
your PDF file in step 7 or step 10.
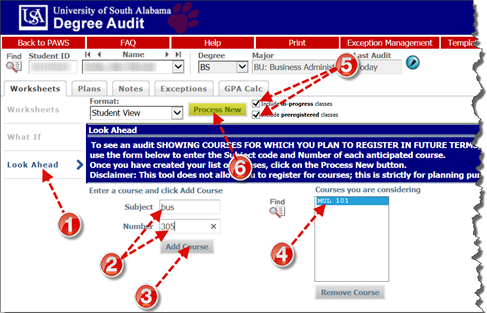
Look Ahead
The Look Ahead feature allows students and advisors to enter courses to see how they will be applied towards fulfilling the student’s degree requirements.
1. With the student selected, click Look Ahead in the left navigation panel on the Worksheet Tab.
2. Type Subject and Number for courses the student is considering.
3. Click Add Course button.
4. After each courses is added, it should appear in the box labeled “Courses you are considering.”
5. Be certain boxes are checked to include in progress and pre-registered classes.
6.
Click Process
Now.
7.
The degree audit will add the courses from Look
Ahead and will label them as PLAN. 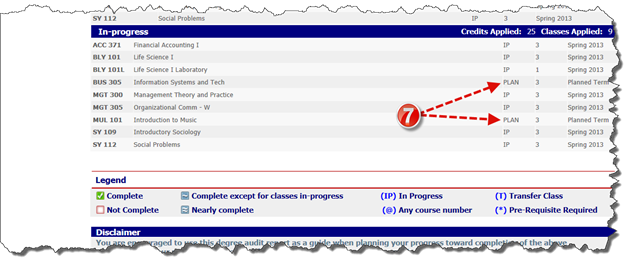
Notes
The Notes utility allows Degree Works users to document academic advising on student records. These Notes can be marked as internal so that students will not see them – but most notes are made public and appear to all users. Notes made available to the student appear in audit reports in a Notes section at the bottom of the report.
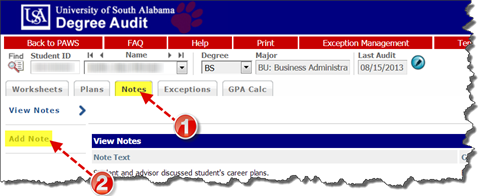
Follow these steps to access the Notes screen.
1. Click on the Notes tab which will bring up the Notes screen with View Notes selected.
Two functions are available from
this screen for all users: View Notes,
Add Notes (Options to Modify or Delete Notes are available to a limited number
of users primarily in the Registrar’s office.)
2.
To add a note, click the Add Note feature in the
left navigation panel.
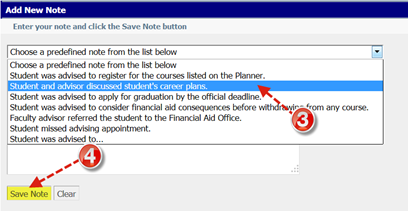
3. In the Add New Note text box choose a predefined note from the list provided or enter the text of the note you wish to add.
4.
Click Save
Note.
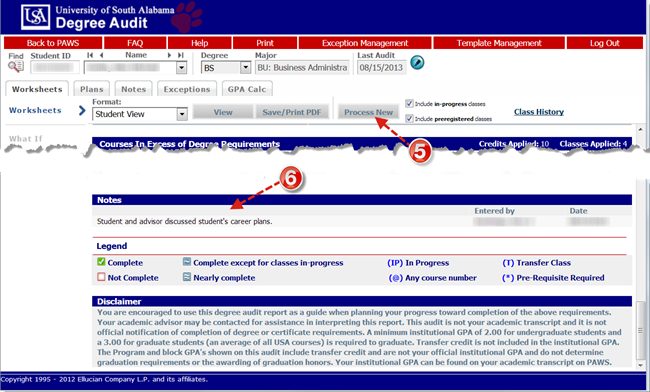
5. In order to display notes added on the Audit Report, you must run a new report. Click Process New.
6. Finally,
to view Notes on the Degree Audit, scroll to the bottom of the screen where the
comments are listed along with the person responsible for the entry and the
date.
Exceptions
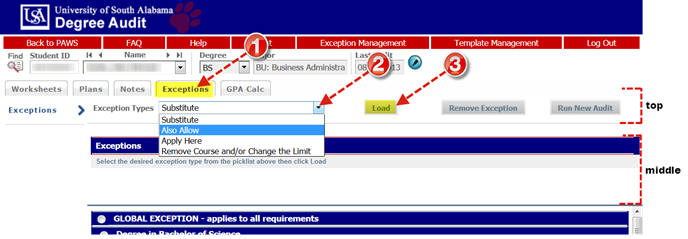
The Exceptions function allows those users having access to this function to modify the requirements for degree completion for a specific student. The Exceptions screen contains three primary parts.
· The upper part of the screen contains a drop-down list of the types of exceptions available to the user. Here Degree Works allows you to process the following types of exceptions:
o Substitute – allows you to substitute one course for another
o Also Allow – appends a course to a course list on a rule
o Apply Here – allows the user to apply a specific course to a rule regardless of the Scribe text or the auditor best-fit algorithm. The auditor will not move courses applied to rules with this exception type unless a block or rule qualifier overrides the exception.
o Remove Course/ Change the Limit – allows you to remove a class from a course rule or qualifier or to change the number of classes or credits required on a rule or qualifier.
· A middle screen initially contains only an instruction to Select the desired exception type from the picklist above then click Load. After this is loaded, the middle screen will appear with additional fields specific to the exception type chosen. Some exception types require more information than others.
· The bottom half of the screen shows all exceptions that have been entered and/or applied to the student’s audit report. The audit shows where each course has been applied and what remaining requirements are left outstanding. The radio buttons are used for selecting the rule on which to add the selected exception.
Working with Exceptions
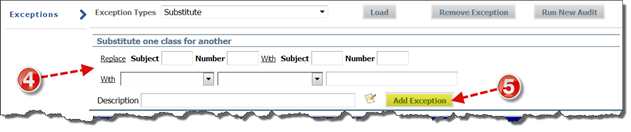
1. To access the Exceptions function, click the Exceptions tab. This will open up the Exceptions screen shown below. The Exceptions tab may not be present on your screen depending upon your User Class level.
2. To add a new exception, select the exception type you wish to add by selecting it from the Exception Type drop-down list.
3.
Click Load.
4. On the middle screen complete fields related to the selected exception. Fill in the information required for each exception type. Once the correct information has been entered, enter a description of the exception being added and click the Add Exception button to save the exception. If you do not enter a description, you will be prompted with a message that one will be entered for you describing the exception type you are using.
5.
Click Add
Excepion.
6.
The bottom
part of the Exceptions screen shows an audit for the student showing all
exceptions that have been entered and/ or applied to the student audit. Select the course rule or qualifier where you
wish to add the exception by clicking the correct radio button.

General Notes for Exceptions
Exceptions are both student-specific and block-specific. In other words, an exception applies to a specific block used in a student degree audit. If an exception is processed in a major block for a student and that student then changes his/her major, the previous exception will no longer apply to the student's new major. However, if the UCX-CFG020 Apply Exception To The Same Block Type flag is set to Y then the exception can be used on the new major but only if the label-tag or qualifier tags between the two blocks match. Unused exceptions will appear at the bottom of the audit report in the Audit Errors section.
Exceptions cannot be used with What-If audits. Exceptions will only appear in the exception screen and on audit reports configured to show Exceptions. By default, the Registrar's Audit report is configured to show exceptions. The text description entered with the exception will appear next to the exception on the audit report along with a time stamp indicating the name and date of the person who entered the exception.
GPA Calculators
There are three different GPA calculators: Graduation, Term, and Advice Calculators. The calculators, in conjunction with current Degree Works functions, can help students in many ways:
· Realistic goal-setting at the beginning of the term or academic career
· Precise calculation of their end-of-term GPA using students' actual academic information
·
Accurate mapping of students' paths for
achieving honors, avoiding probation, or satisfying
personal academic aspirations
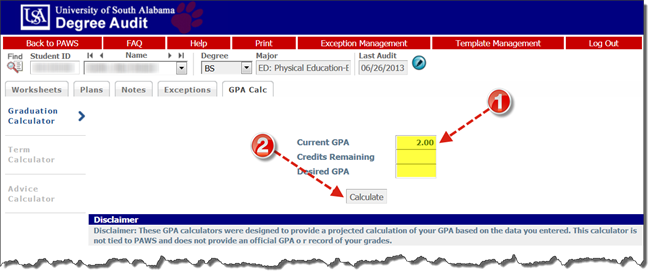
Graduation Calculator
Input fields for the Graduation Calculator include these fields:
· Current GPA
· Credits Remaining
· Desired GPA
This calculator takes the most "unknown" inputs. Many students may not know how many credits are required for their degree, nor the number of credits remaining. Its purpose, however, is to give the student a general view of what average GPA they will need to achieve over their final "X" credits in order to achieve their desired GPA. In some cases, this calculator will be useful to inform the student that their desired GPA is not possible to achieve (considering their number of credits remaining). In short, this calculator helps students to set long-term general goals.
1. Enter data into the vacant fields as below and;
2.
Press Calculate. The following screenshot shows you what
average you will need to attain your desired results:
If you wish to alter some of the entries, click Recalculate
and the calculate screen will appear for you to make other entries. When you
click Calculate, the revised information will appear.
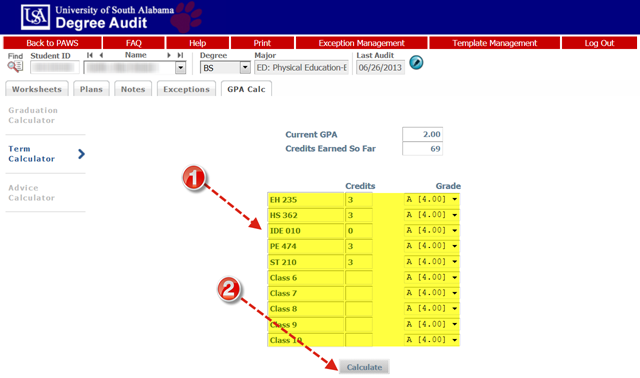
Term Calculator
Input fields for the Graduation Calculator include these fields:
· Current GPA
· Credits Earned
· Class information
To run a calculation for the term:
1. Enter class information with expected credits and grades.
2.
Click calculate. The following screen will produce the new
calculated GPA.
This is the most specific calculator. If you wish to change class or grade information, simply click Recalculate and the original screen will again be presented for you to make changes. When you click Calculate, the revised information will appear.
It can be used for goal-setting as well as mapping paths to avoid probation, achieve honors, etc. Again, this uses UCX-STU385 to select the grades that are specific to your institution. Other configurations include: the ability to control how many classes are available for input; the option to use drop-down list boxes (default) with values coming from UCX-STU385 for the GRADE field (ex: A- [3.700]), or simply text boxes for users to type in the grade value (ex: 3.4).
Enter data into the vacant fields as below and press Calculate. Note that the student's current classes and credits have been preloaded into the form.Notice the use of the drop-down list box shown in Class 5. The following shows you the results of your calculation.
If you wish to alter some of the entries, click Recalculate and the Term Calculator screen will appear for you to make other entries. When you click Calculate, the revised information will appear.
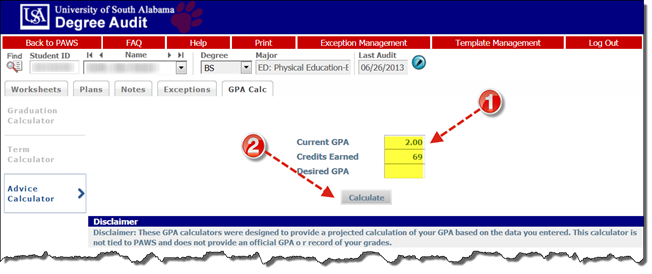
Advice Calculator
Input fields for the Advice Calculator include these fields:
· Current GPA (provided from RAD-TERM-DTL: RAD-CUM-GPA),
· Credits Earned (provided from RAD-TERM-DTL: RAD-CUM-TOT-EARN),
· Desired GPA
This calculator is perhaps the easiest to use. The student need only provide their desired GPA. It is used to figure out how a student can raise/lower their GPA using actual grades as advice. While it is fairly general, it is more specific than the graduation calculator. An important feature is that the grades are calculated using UCX-STU385. This table contains the Grade (letter value) as well as grade points for specific grades. So by manipulating UCX-STU385, you can determine how the advice is calculated. However, the Graded Attempted flag in UCX-STU385 is also used to further filter out grades – only those grades with Graded Attempted = Y are used in the Advice Calculator – allowing you to exclude P grades for example.
1. Enter data into the vacant field as below and
2.
Press Calculate.
The following shows you what average you will need to attain your
desired results.
If you wish to alter some of the entries, click Recalculate and the advice screen will appear for you to make other entries. When you click Calculate, the revised information will appear.