Using DocRoute to Request an Official Name Change
Submitting Your Original Request
 Navigate to the student Logins page on the USA Website.
- Select the bottom, left tile with the DocRoute Logo.
- Use your USA student credentials to login to the program.
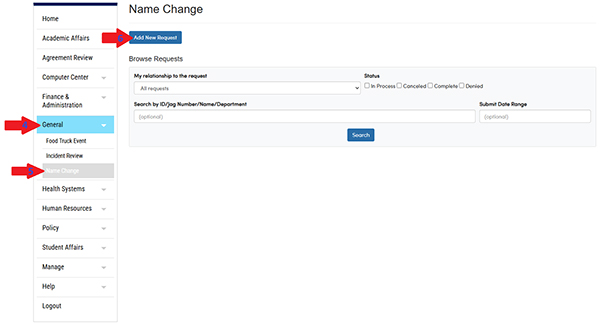 Once logged in, select the ‘General’ tab from the list on the left side of the screen.
- Then, select ‘Name Change’
- At the top of the screen, select ‘Add New Request’
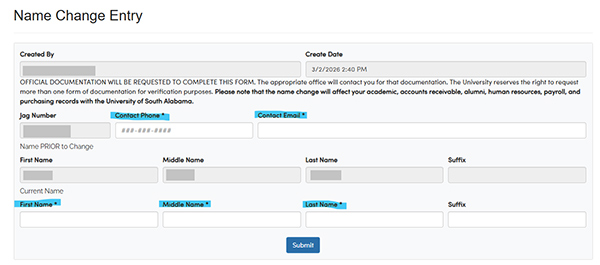 Fill in the fields highlighted in the image above. You have the option to include
a suffix if you wish to, but it is not required.
Fill in the fields highlighted in the image above. You have the option to include
a suffix if you wish to, but it is not required.- Submit your request.
Notes:
★ Please double check for any typos before submitting your request.
★ Your request will be auto routed to the correct office for processing based on any potential employment history:
➢ If you are a current or former employee of USA Campus (including student workers), your request will be routed to USA Main Campus HR.
➢ If you are a current or former employee of USA Health, your request will be routed to USA Health HR.
➢ If you have never worked for USA in any capacity, your request will be forwarded to the Registrar’s Office. - Once your request is submitted, you will need to submit required documentation to
have your request processed.
★ If your request was routed to one of the HR offices, you will need to send a copy of your Social Security Card to the appropriate HR department.
★ If your request was routed to the Registrar’s Office, you will need to send a copy of one of the following documents to the Registrar’s Office:
- Birth Certificate
- Marriage Certificate
- Court Order/Divorce Decree
- Social Security Card
- Passport or Visa
- Your name will be updated after the correct office has received your official documentation.
Reviewing a Previously Submitted Request
- Navigate to the student Logins page on the USA Website.
- Select the bottom, left tile with the DocRoute Logo.
- Use your USA student credentials to login to the program.
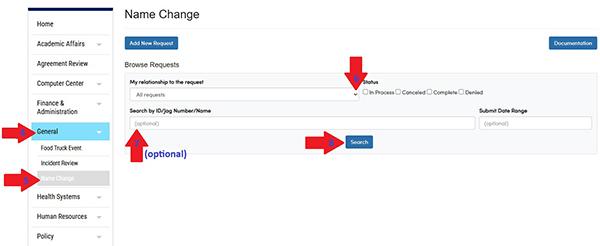 Once logged in, select the ‘General’ tab from the list on the left side of the screen.
- Then, select ‘Name Change’
- In the ‘My relationship to the request’ drop down menu, select ‘Created by me’.
- Optional: Type in your Jag ID.
- Select ‘Search’.
 Once you pull up your request, there is a lot of helpful information that you can
review:
Once you pull up your request, there is a lot of helpful information that you can
review:
- Under the ‘Reviews’ section, you can see which office your request was routed to. This can be helpful if you need to reach out to that office with any questions or concerns regarding your request.
- At the bottom of the screen, you will find a ‘Work Log’ section. In this area you can find helpful information regarding the status of your request or instructions for next steps
- Above the Work Log is a ‘Comment’ section. You can use this section to provide additional information to your request or to submit any questions or concerns you may have to the department that is processing the request. Any comment you submit here, will be added to the Work Log below.