Navigate South
Navigate South is a multifunctional web-based retention and advising tool designed by Education Advisory Board (EAB). It incorporates data to build a predictive model for current student success, provides institutional data on graduation, course success, and major changing, offers an advising platform with summary data on students and reporting capacity, and includes functions for attendance and course progress. Navigate South is open to all faculty and professional advisors.
Our partnership with Navigate South also includes access to the EAB Academic Affairs Forum. The EAB website includes a wide range of white papers, webinars, and case studies related to the academic mission of colleges and universities.
For on campus support with Navigate South, please contact Dallas Schmidt, dallasschmidt@southalabama.edu.
For Students
Find your academic advisor -
Navigate South is an easy way to schedule an advising appointment with many advisors on campus, to request a tutor, and to review information from advising appointments such as degree plans.
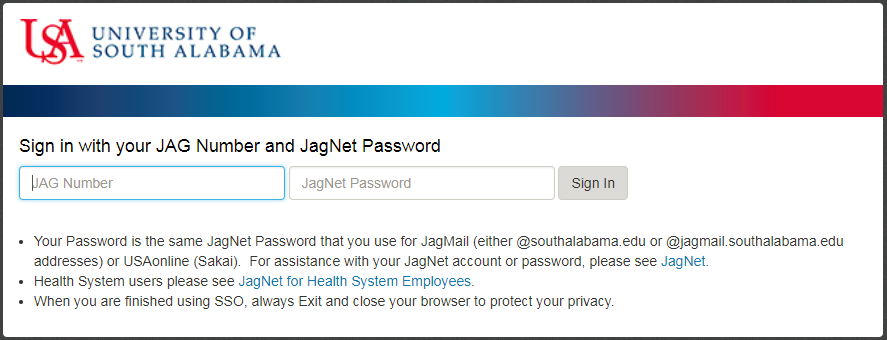
How to Log into Navigate South
- Click the "Logins" at the top of the USA Homepage
- Select Navigate South
- You will need to log into Navigate South using the single sign on system. Your J-Number as the Username. The password should be the same as your JagMail/JagNet password. This page can be saved in your web browser under favorites.
To Find Your Primary Advisor in Navigate South
- Log into Navigate South.
- On the Student home page, scroll
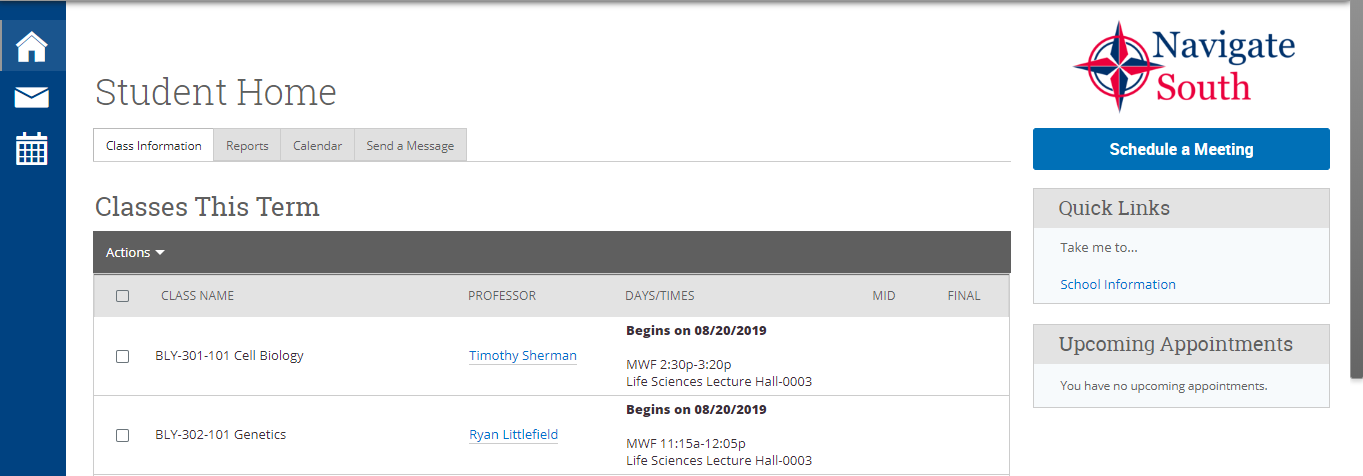
- Your primary academic advisor will be listed as the first name with the designated
Advisor, Relationship.
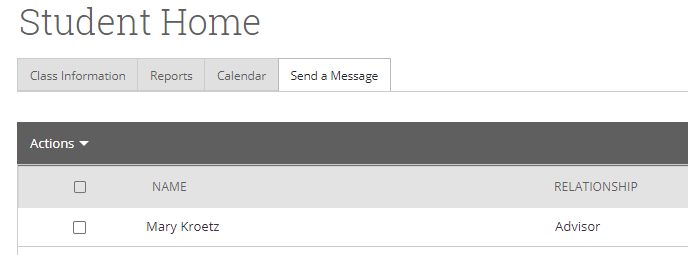
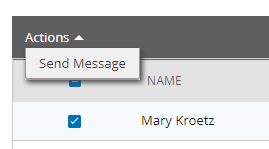
- If you would like to send your advisor an email, you can click on the open box next
to their name. Then click Actions. Then click Send Message.
- An email message window will pop up.
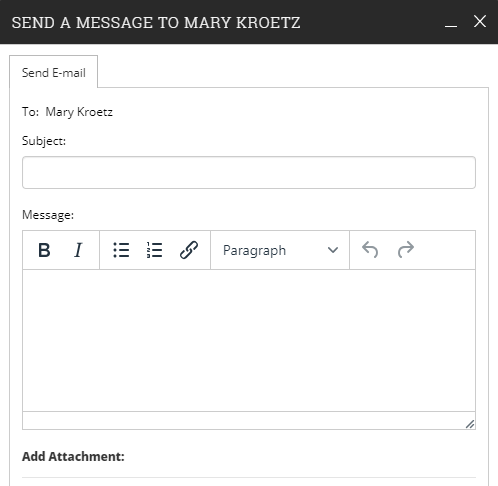
- When you complete your message and the subject line, scroll down and click the Send
Message button.

- The message will include your last and first names as well as your JagMail address in the header. As a general rule, you should also include your Jag Number either in the body of the email or at the end of the email. This will ensure you are identified correctly and provided with the information specific and relevant to you.
How to Schedule an Advising Appointment
· Log in to PAWS, and go to the Student Services and Financial Aid tab. Then
click on the Student Records link. Near the bottom of the list under Degree Evaluation,
you will see a link for Navigate South. Click that link, and it will take you to
the Navigate South system.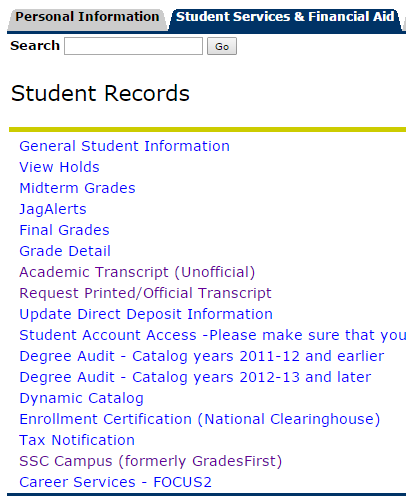
· You will need to log into Navigate South using the single sign on system. Your J-Number as the Username. The password should be the same as your JagMail/JagNet password.
· On your home page, you will see a button on the right-hand side that says
Schedule an Advising Appointment. Click this button.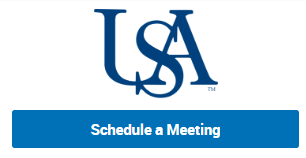
· On the next page, you will be prompted to select a reason for your advising
appointment. Then click the Next button.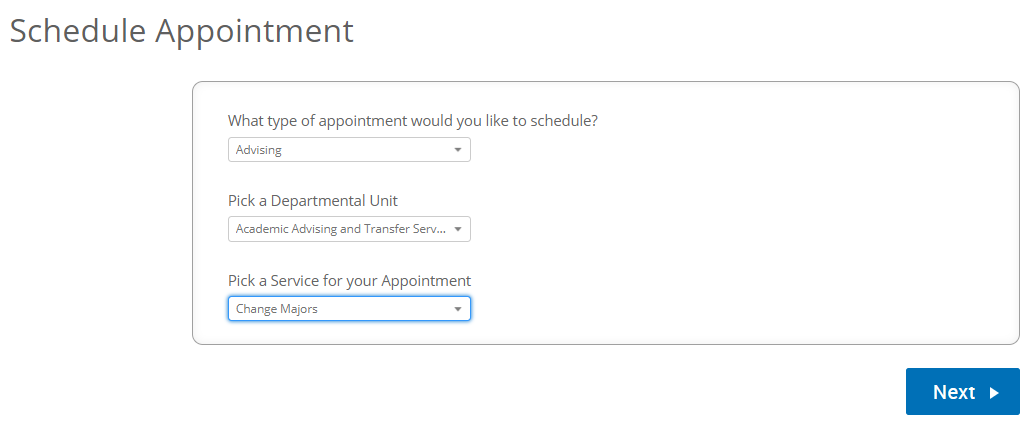
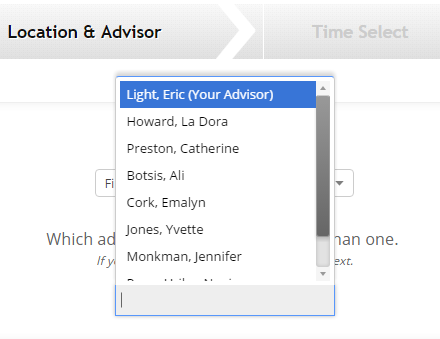
· Select the location for your advising appointment from the drop down menu.
Next select an advisor. Your assigned advisor will be at the top of the list.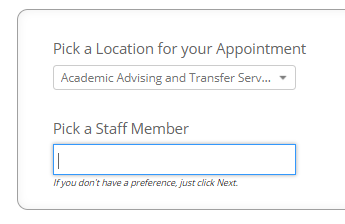
· Once you click Next, you will see a grid with that advisor’s available appointments. If you don’t see any appointment times click the Next Week arrow.
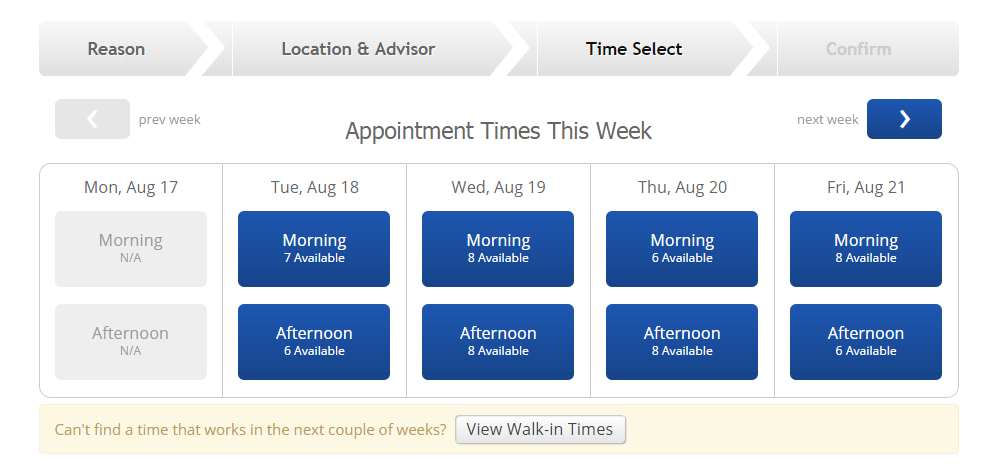
· Click on the box for the morning or afternoon of the day you are interested in to see available times. You can use the arrows to move to the next week.
· Once you see the available appointment times, click on the one you want
to schedule and click Next.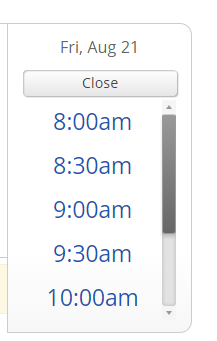
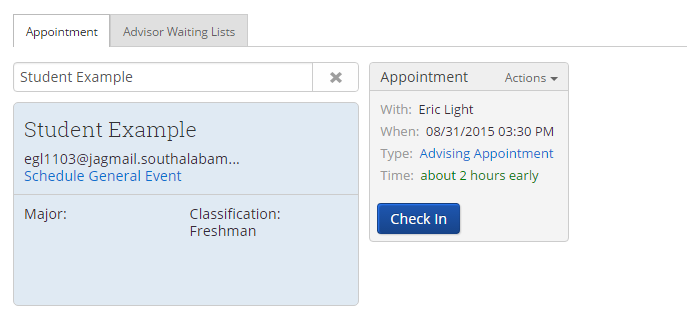
· The details of your appointment will appear on the screen as shown below.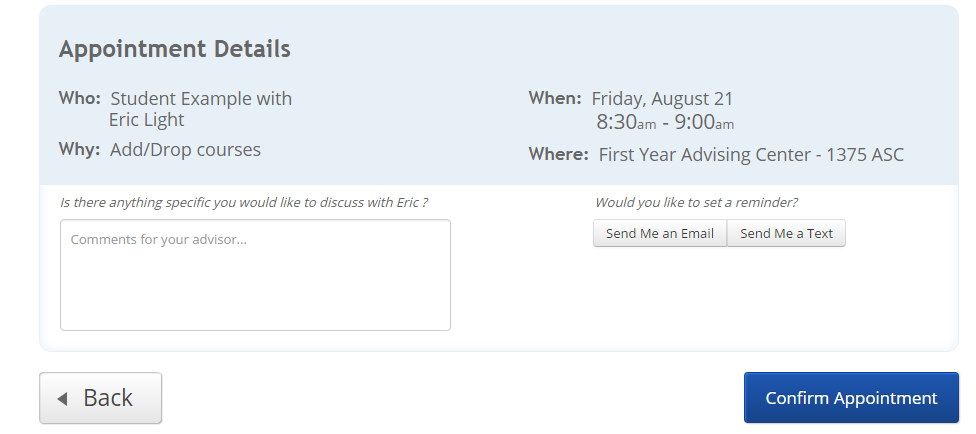
· If you would like to receive an email reminder, be sure to click that button. This email will go to your JagMail address the day before your scheduled appointment.
· If you would like to receive a text reminder click on that button as well. You will receive a text reminder 2 hours before your scheduled appointment.
· If your cell phone number is not in the system, you will be prompted to
enter it. If it is in the system, you will be prompted to confirm it. Please enter
the phone number with the area code using dashes (e.g., (251) 341-4017). We recommend
you choose a least one reminder type before saving your appointment.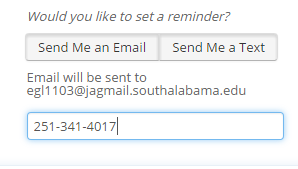
· Once you have entered this information and confirmed that the date and time of the appointment is correct, click Confirm Appointment to schedule the appointment.
How to Schedule a Tutoring Appointment
1. Log in to Navigate South
2. On your home page, you will see a button on the right-hand side that says
Schedule a Meeting. Click this button.
3. On the next page, you will be prompted to select a reason for your appointment.
Then click the Next button.
4. Select the location for your appointment from the drop down menu. Next select
a tutor. If you do not have preferred tutor, just select next.
5. Once you click Next, you will see a grid with available appointment times. If you don’t see any appointment times click the Next Week arrow.

6. Some tutoring services on campus are available for Drop-in/Walk-in Times. If you do not see any available times listed, click on the View Walk-in Times to see the availability. Walk-in times cannot be pre-scheduled, but you are welcome to the come to that location and meet with the tutors available.
7. Click on the box for the morning or afternoon of the day you are interested
in to see available times. You can use the arrows to move to the next week. Once
you see the available appointment times, click on the one you want to schedule and
click Next.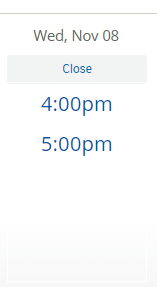
8. The details of your appointment will appear on the screen as shown below.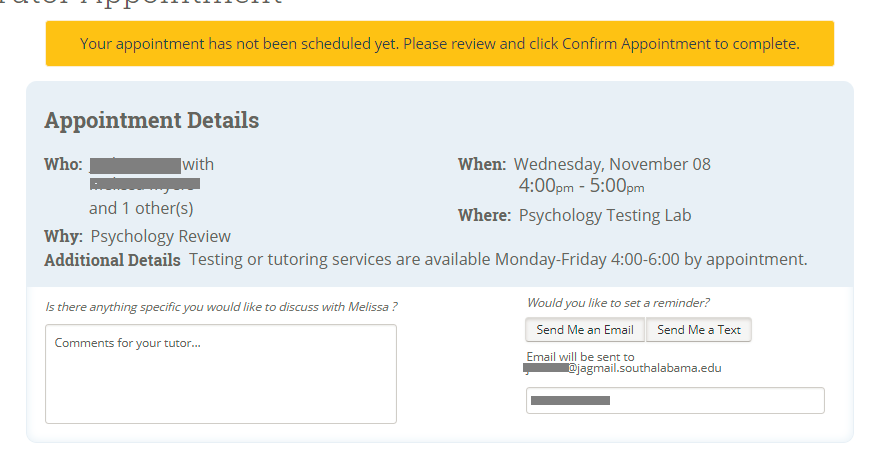
9. If you would like to receive an email reminder, be sure to click that button. This email will go to your JagMail address the day before your scheduled appointment.
10. If you would like to receive a text reminder click on that button as well. You will receive a text reminder 1 hour before your scheduled appointment.
11. If your cell phone number is not in the system, you will be prompted to enter
it. If it is in the system, you will be prompted to confirm it. Please enter the
phone number with the area code using dashes (e.g., (251) 460-6101). We recommend
you choose a least one reminder type before saving your appointment.
12. Once you have entered this information and confirmed that the date and time of the appointment is correct, click Confirm Appointment to schedule the appointment.
How to View your Appointment Reports in Navigate South
1. Log in to Navigate South
2. On your Student home page, you will see four tabs listed at the top of the
page: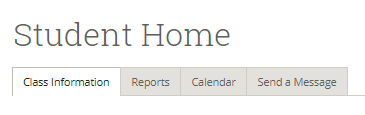
3. Click on the Reports tab to view any Progress Report, Advisor Reports and
Notes.
4. To view the details of the appointment report, click “View Report.” This will give you a pop up window with the appointment details and summary.
5. Under the Appointment Summary section, you can see any documents that were
attached to this report such as Academic Plans or other paperwork that was completed
during the appointment. 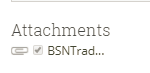
6. Simply click on the file name to download the file to your computer. Please note that some types of documents may not fully download on phone/tablet operating systems.
For Faculty and Staff
Navigate South provides a powerful platform for advising and communicating with students, scheduling advising and tutoring appointments, keeping course attendance, and issuing alerts for students who might be at-risk.
All information contained in Navigate South is part of the students' education records and therefore are come under FERPA.
Who are the Designated Records Officials within the University?
The University has designated the Office of the Registrar as the records official
for all student academic records and transcripts. The Associate Deans over the Colleges
are the records officials responsible for student records in their colleges. In addition,
the University has designated the following officials as the records officials for
their respective areas:
- Vice President of Student Services for all other records pertaining to students, excluding the College of Medicine
- The Director of Career Development for student records maintained in that office
- The Associate Dean for Academic Affairs for the College of Medicine
- The Veterans Affairs Specialist for student records maintained in that office
Who on campus may access student records?
At USA, only faculty, administrators, and staff who individually or collectively have
a legitimate educational interest in the student records and are acting within the
limitations of their need to know may access student educational records without prior
consent of the student. This would include personnel in academic offices as well as
student support offices (Admissions, Student Accounting, Financial Aid, Registrar,
etc.). This is true even if the student has been granted non-disclosure.
How do I know if a student has signed a Request for Non-disclosure?
When using Banner to access information on a student who has been granted non-disclosure,
an alert box will display the message, "Warning: Information about this person is
confidential." The user must click "OK" to view the record. The word "Confidential"
will appear in the top left-hand corner of every subsequent screen on Banner for that
student. Faculty or advisors using PAWS will see the message, "Confidential" on class
rosters and degree audits for that student.
The only proper response to inquiries from third parties for any information about such a student must be "Federal Law prevents me from answering this question."
How does FERPA apply to faculty and staff?
Faculty and staff are required by law to handle students' education records in a legally
specified manner. The following list should help clarify what is expected.
Do not post grades by name, Jag Number, or any portion of social security number. The University discourages public posting of grades, even if identity codes are used. The University does not permit the emailing of grades. The Office of the Registrar will post final grades on PAWS at the end of the term and students use a secure website to retrieve that information.
- Do lock desks, file cabinets and rooms that contain student records before leaving them unattended.
- Do guard student records on your computer.
- Do not put transcripts, degree audits, grades, etc. in the trashcan. Shred any paper containing personally identifiable information.
- Do not leave graded papers with student names or Jag Numbers on a table for students to collect. You must not allow students access to other students' grades or personal information.
- Do keep your personal professional notes regarding students separate from education records. These "sole possession" notes must be kept private, not accessible by any other person except for a designated substitute.
- Do procure a written release from a student if you are accessing an education record to write a recommendation. If you will make reference to grade point average, or a particular grade in a course, etc., you must have a written release.
- Do not discuss student daily attendance, academic progress, or grades with a student's parent or guardian. Refer all such inquiries to the proper records official.
- Do refer all other third party requests for information from education records to the proper records official.
When in doubt, err on the side of caution and do not release the requested information. Contact the Office of the Registrar if you require clarification of any portion of FERPA regulations.
Whom should I contact with questions or concerns?
Direct general questions to the Office of the Registrar.
How to Log into Navigate South
Click the "Logins" at the top of the USA Homepage
Select Faculty and Staff
Select Navigate South
You will need to log into Navigate South using the single sign on system. Your J-Number
as the Username. The password should be the same as your JagMail/JagNet password.
This page can be saved in your web browser under favorites.
Setting up Appointment Availability in Navigate South
1. Log into Navigate South.
2. From home screen, select My Availability tab. 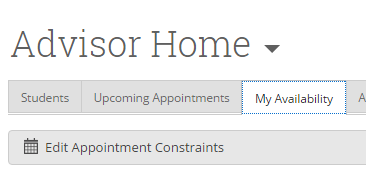
3. Click on “edit appointment constraints” – this area allows you to set how many hours in advance students can schedule an appointment. Default appointment lengths are set universally at 30 minutes. If you prefer a different setting, you will change this item. Do not un-check the “require available times for students” or your students could schedule any time they wish. Click on update button to save. You can then hide the constraints from view. ONLY NEED TO DO THIS ONCE.
4. Under times available area, click “Actions” then “Add Time.”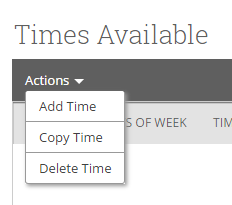
5. This brings up a pop up item to set availability. Make your selections. Select the days, use the slider for the times, and select Drop-ins, Appointments or Campaigns, duration (all semester, date range, forever [we don’t recommend forever], location, and services. Then select save.
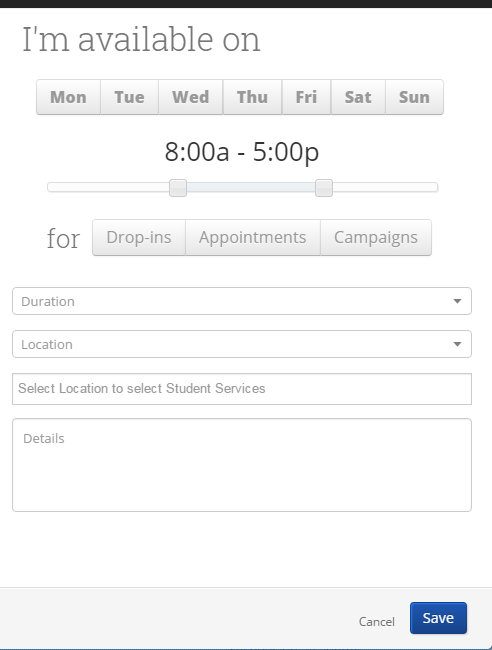
6. Once you have saved an availability you can return to this page to update it as needed. In addition you can copy an availability and make changes for different days of the week or times in the semester as needed.
1. Drop-ins used for open office hours – students cannot actually schedule an appointment (mainly used for walk-in tutoring hours)
2. Appointments – used for when you are available to see students without using an appointment campaign.
3. Campaign – used for when you want to invite specific students (major, class, GPA range, etc.) to appointments you have set aside specifically for this appointment campaign.
Setting up Appointment Campaigns in Navigate South
1. Appointment availability must be set first. See separate instructions.
2. Select appointment campaigns from the options on the right side of your screen. 
3. Select appointment campaign from “I want to create a new…” area on right
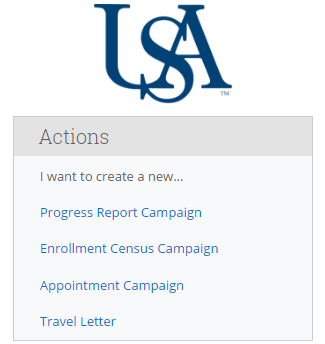
4. Name it something that makes sense and is individual to you so that you may find it again. Include your name if others in your department also use campaigns.
5. Select advising from campaign type drop-down.
6. Do not change “slots per time” – is set at 1, unless you are doing a campaign for group advising sessions.
7. Select reason, these are the student services that are available. You must have availability for this same student service in your appointment availability.
8. Select date range for the campaign. This can be edited at a later time – for example when adding additional availability and/or adding more students.
9. Set appointment length – typically 30 minutes.
10. Set appointment limit. Any number >1 means individual students can use the same email/link to schedule more appointments. We recommend keeping this at 1.
11. Select your location and click continue.
12. Search for students - search criteria or select only your students. Search criteria can use any combination or available criteria. Note: if you teach courses do not select the “Invite All My Assigned Students” option. This will include all student who are assigned to your courses this semester in addition to your advisees. In the Advanced Search function you can search for students that are assigned to you as their advisor.
13. On the list of students the box next to NAME will select all on the list or individual students can be selected and click continue.
14. Next screen allows you to review the list of students and de-select any you wish to remove from the campaign. Click continue.
15. Add yourself as the advisors to the campaign. Make sure the button is checked
on the top right of the staff list. ![]()
16. The next screen allows you to Compose you email message that will be sent to students. Compose a subject line for your message
17. Compose your message. Instructions or notes – example “when arriving for appointment, come directly to my office” or “when arriving for appointment, check in at department office” etc. Instructions for making an appointment will be automatically included in the campaign email you do not need to add them in this section.
18. Review your message, preview what the email looks like to students, and preview what students see when they click the link. Click continue.
19. Check all details in final review screen. Click send to launch the campaign.
During/after campaign
· Can be used to see who has yet to schedule an appointment.
· Can re-send campaign.
· Can edit the campaign (add more students, extend campaign).
· Can see campaign stats at a glance

If there is a centralized office that students are directed to check-in before they come to your office, students can be checked in using Navigate South, and you will be notified of that check-in through Navigate South.
1. Click on the Additional Modes on the bottom right-hand side of any Navigate South. You will likely need to scroll down the page to see this link.
2. Click on Appointment Center. 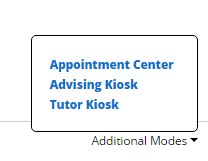
3. Click on the location of your center.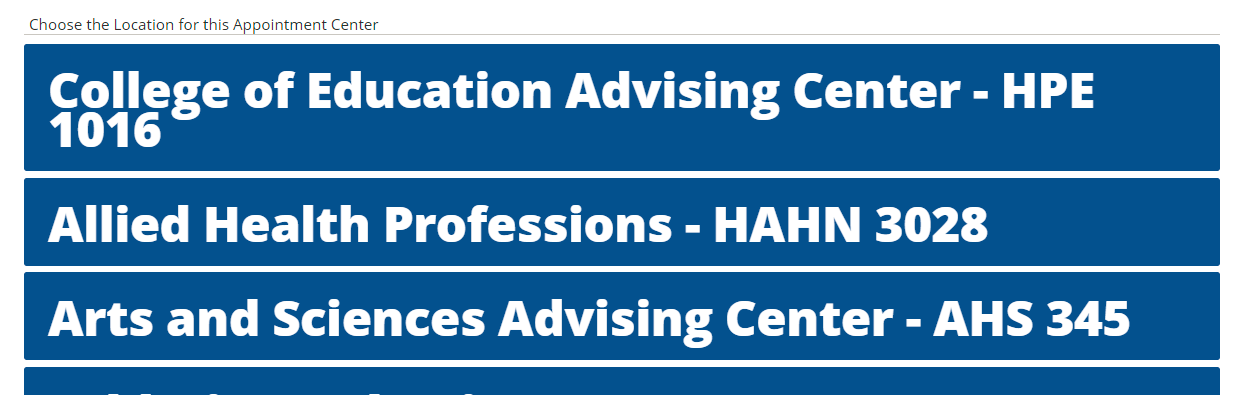
4. This will take you to the Appointment Center mode. The screen should load with today’s appointments and your location staff availability
- Access your Appointment Center as shown above.
- Search for the student and bring up his/her record as shown below. Students can be
searched using their name, Jag Number or JagMail email address.

- The appointment information will display the student’s information. Click “Check
In” to log the student into the advisor’s queue.
- The advisor will get a notification on their screen that the student is checked-in and waiting.
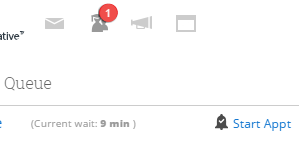
- When a student checks in for an appointment they will be placed in your Advising Queue.
At the top of the page in Navigate South you will see a red number appear showing
how many people are currently in the Queue.
- Students who do not have an appointment but are waiting to see either you or the first
available advisor will be in your Students in My Queue section on your Advising Center
tab on your Home page. If they are waiting for the first available advisor then they
will have Yes in that column of the queue.

- Clicking on the Appointment Queue icon will show a drop down of students waiting.
You can click on the students name to pull up that student’s specific profile before
starting the appointment. Once you are ready to meet with the student click on the
“Start Appt” link.
If students report directly to your office for appointment then follow these directions below.
1. Appointments scheduled prior to the appointment time are listed on your Advisor Home page under the “Upcoming Appointments” tab.
2. You can click on the student’s name listed under the “ATTENDEE” column to
view the students profile prior to the appointment. 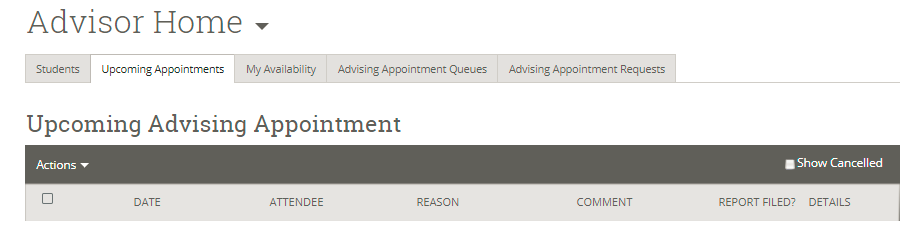
3. Once the start time for the scheduled appointment passes, the appointment will move from Upcoming Appointments to the Advisor Reporting area on the lower part of your Advisor Home page.
4. To start the appointment, click on the box next to the appointment, then click
Add Advising Appointment Report under Actions.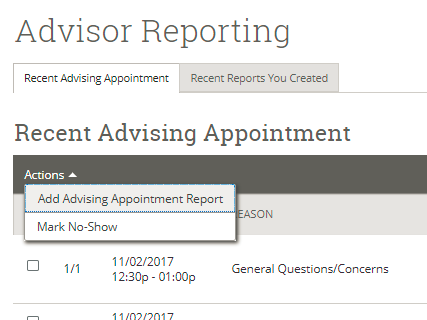
5. Clicking on “Report On Advising Appointment” from a student’s profile page creates a new appointment starting at the time you clicked this link. If a student has pre-scheduled an appointment this creates two different appointments at the same time. The student is considered a No Show for the prior scheduled appointment and the data for appointment becomes skewed. The “Report On Advising Appointment” is intended for unscheduled drop in appointments in cases where students are not check in at the centralized location.
1. An Advising Report will automatically pop up on the screen once the Add Advising
Appointment Report under Actions link is clicked. Information from the appointment
will automatically be completed in the report. You can minimize the report to look
at the student profile by clicking the “_” next to the “x” at the top of report.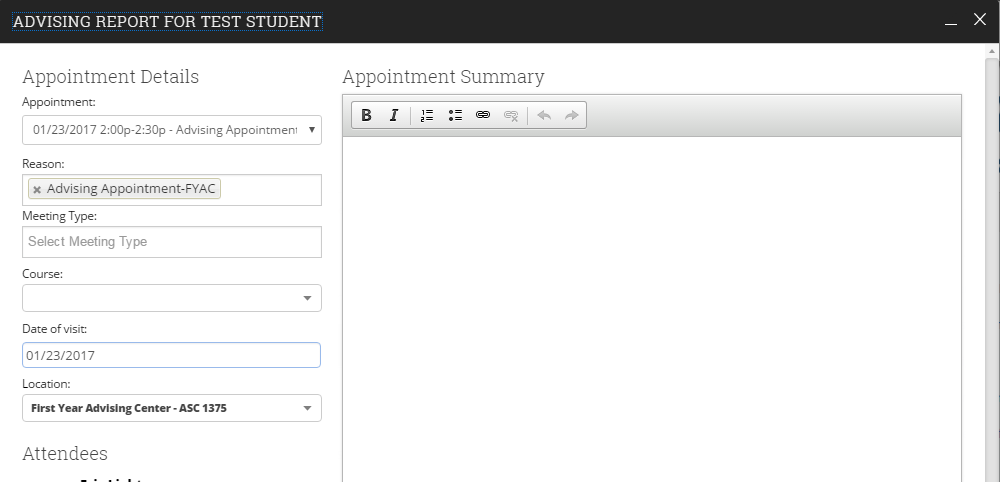
2. When the report is minimized you will see a number in the box shaped icon
at the top of screen. Clicking this icon will pull of your list of open reports.
Click on the student name to reopen the pop up window containing the report.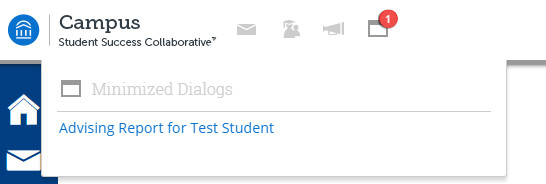
3. Enter your notes in the Summary box and click Save this Report. Do not click Cancel this
will check the student out of the appointment and unstart the appointment. 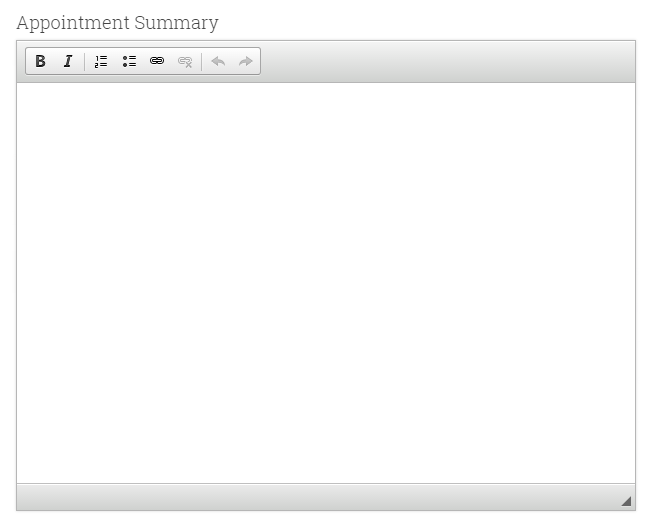
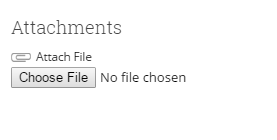
4. If you need to attach an academic plan or other document click on the “Choose File” button below the summary block. Select the file to upload from your files and it will be added to the report. Attachments can be in Microsoft office formats or pdf’s.
How to Create a Watch List in Navigate South
Create a CSV file with student ID’s listed in the first, left-most, column with a header in the first cell.
Go to the Lists & Searches on the right side of the screen in Navigate South.
In the watch list area go to actions, which will drop down a menu with Upload Watch List as the third option.
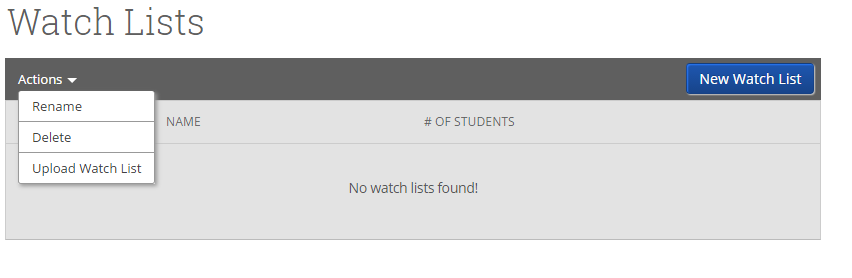
Select New Watch list, and name this list (e.g. registrationspring2017). Find your
CSV file and upload it.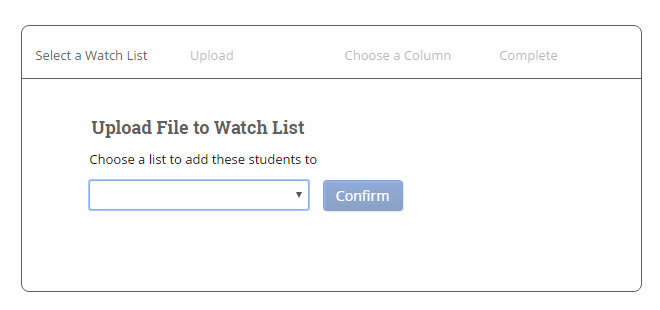
Select the column from your list which contain the student ID#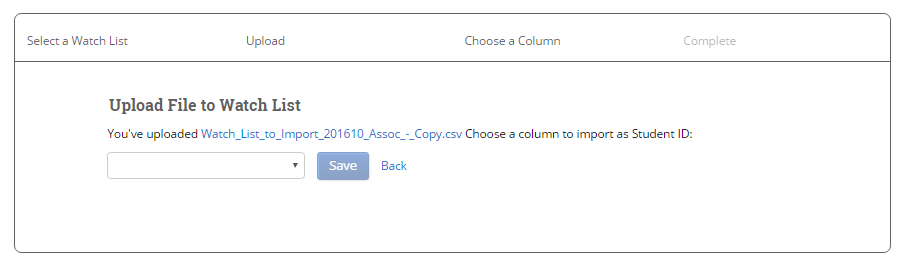
Then click save. If there is a large number of students on the list it may take several minutes for all students to appear on the watch list.
Updating a Watch List in Navigate South
To add additional students to a current watch list from follow the same steps for creating a watch list using a CSV file. Any students that are duplicated in the csv file will remain from the prior creation and not have two entries in your watch list.
It is also possible to add individual students to a watch list.
Go to the Lists & Searches on the right side of the screen in Navigate South.
Click on the blue name of the watch list to which you wish to add a student. 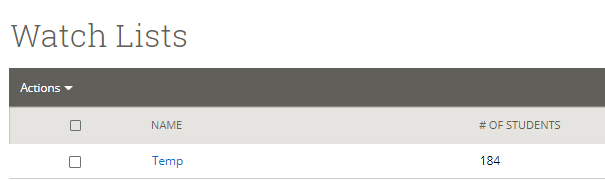
Click the Add Student button on the right side of the action bar at the top of the
list. 
This will give you a pop up search window in which you can enter a student’s name
or Jag Number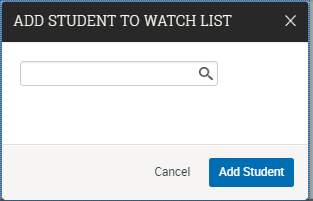
Then click on the student’s name and the Add Student button
To remove a student from a watch list.
Go to the Lists & Searches on the right side of the screen in Navigate South.
Click on the blue name of the watch list to which you wish to remove students.
This will pull up a list of all students currently on this watch list. 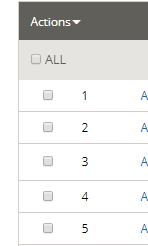
Click on the small square next to the student’s name and it will be marked with a check mark.
You will need to individually check each student you intend to remove from the watch list.
If you have more than 100 students on the list, there will be multiple pages for the watch list noted at the bottom of the list.
You will need to edit this list one page at a time. It is best to begin with the last page of the list.
Once you have marked students to be removed, click the down arrow next to Action at the top of the page.
Near the bottom of the drop down menu, click on Remove from Watch List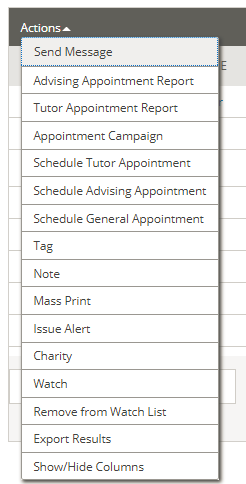
You will be asked to confirm the removal in a pop up window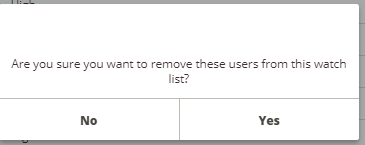
Once Yes is clicked the marked students will be removed.
Sending Email to students on a Watch List
Go to the Lists & Searches on the right side of the screen in Navigate South. 
Click on the blue name of the watch list to which you wish to send an email.
If you wish to send an email to all students on the list click the box next to ALL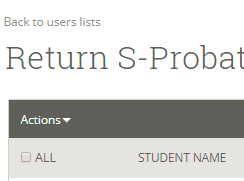
You can also select individual students from the watch list by clicking the box next to their name.
Once the students are selected, click Actions.
In the drop down menu that appears select Send Message. 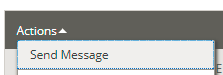
The will give you a pop up window to create you email message. 
The message entered will be sent as an individual email to all students checked previously. Please do not include personal information relevant to an individual student.
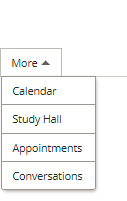
Once the message is created click Send Message and Navigate South will create the individual emails and send them to all students on the list or those students selected on the list. These emails will be logged into the Navigate South system and can be viewed in the students profile under the More tab in Conversations.
Using this approach, the email sender includes the address of the person using Navigate South and creating the email from the watch list. When a student replies to the email it will go that person’s JagMail.
How to Record Class Attendance in Navigate South
1. Log into Navigate South
2. From your home page, select the triangle next to Advisor Home switch to the
Professor Home.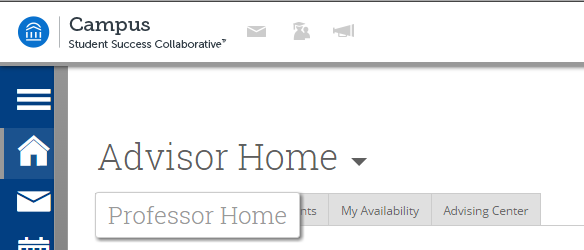
3. On the right side of screen select, Record My Class Attendance, option in
Quick Links.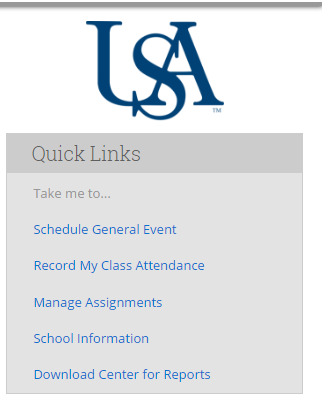
4. Select the course, for which you want to record attendance. The system will default to today’s date for recording attendance, but can be switched to any date in the Choose a Date selection below Choose a Course.
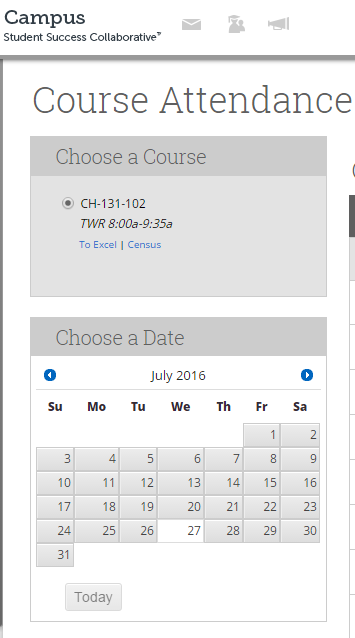
5. Once the course is selected you will see a list of all student enrolled under
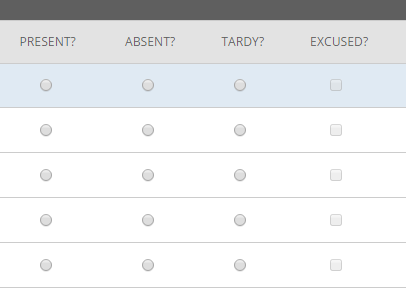
the following headings. The listing will be in alphabetical order.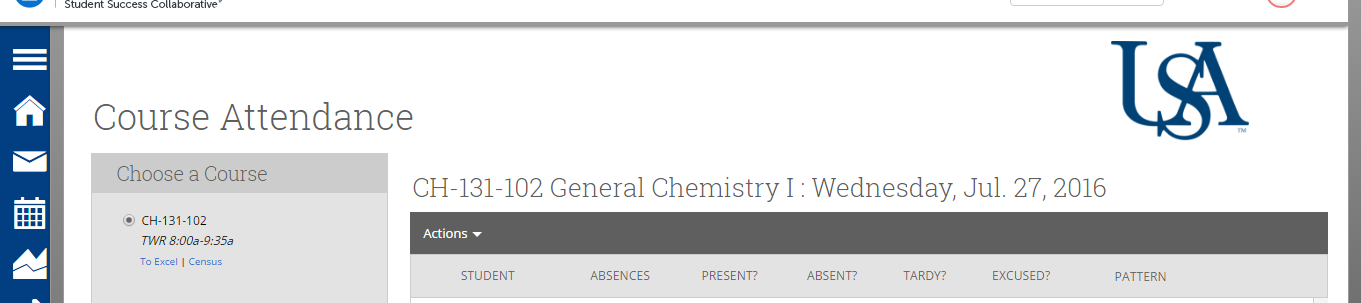
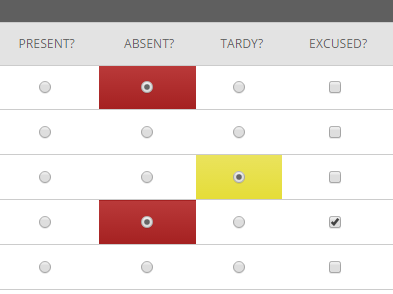
6. On the list you will need to select the circle for those students who were absent or tardy. And those who were excused from the absence.
7. Once all absent and/or tardy are marked scroll to the bottom of the course
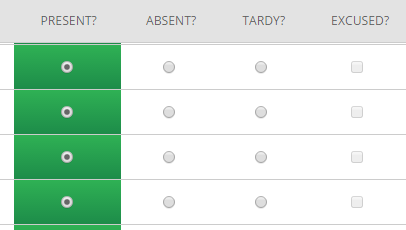
roll and select Mark Remaining Present. Those not marked previously as absent or tardy
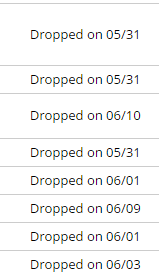
will be marked as present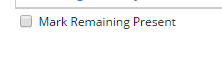
8. At the bottom the course role you will see a list of students who dropped the course. Once Mark Remaining Present is selected these students will also have a present designation on this screen. However, once attendance is saved, the system will not record them as present for any course date beyond their dropped date.
9. At the bottom of the course roll you will see a count for attendance entered.
This give you a quick opportunity to verify numbers before saving. 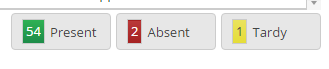
10. To save the information entered click on the Save Attendance button below the
course roll.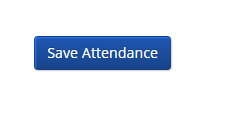
11. Once this is saved you will see Attendance saved pop up in the top right hand
corner of the screen. 
12. At this point the attendance is completely recorded and saved for that date.